
PT 2 : AR15 UPGRADE - REMOVING GAS BLOCK, GAS TUBE, BARREL NUT, FLASH HIDER
February 8, 2019
Learn how to upgrade your AR15 with tips on removing gas blocks, gas tubes, and other components in this step-by-step guide.
Quick Look
Overview
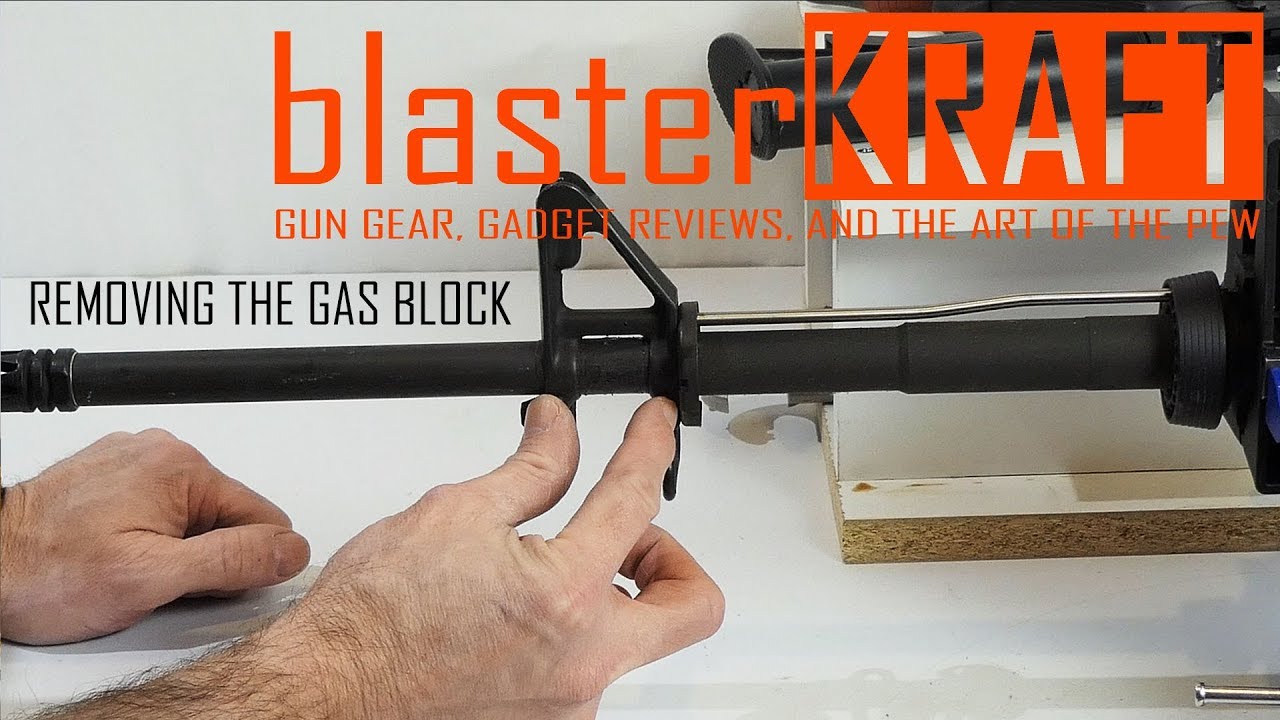
In this second installment of the AR15 upgrade series, we're diving into the nitty-gritty of removing key components from the Colt AR6721 AR15A3 Tactical Carbine. This video showcases practical techniques anyone can use to disassemble their AR15, prepping for new upgrades. Whether you're a seasoned gun enthusiast or a novice, this guide will walk you through every step of the way, ensuring a smooth upgrade process.
What This Video Demonstrates
This video emphasizes essential disassembly techniques, focusing on removing the gas block, gas tube, flash suppressor, and barrel nut. The disassembly allows for the installation of a new 15" free float handguard, highlighting techniques that can simplify the process for builders at all skill levels.
Step-by-Step Explanation
The video starts with the removal of carbine-length handgrips, utilizing a combination of manual effort and simple tools for those stubborn parts. There's a clear demonstration of using channel locks and a vise for better leverage and control, which can enhance your ability to manage tricky components.
Next, the removal of the gas block is addressed in detail. It’s crucial to correctly identify the tapered sides of the pins for effective removal. This segment underscores the importance of having the appropriate tools, including a punch and hammer, and introduces some troubleshooting tactics when encountering stuck components.
Penetrating oil plays a significant role in easing the extraction process, especially for parts that have been secured for a long time. The presenter also shares tips on applying oil correctly and waiting to allow it to permeate stubborn areas before attempting further removal.
When addressing the flash suppressor and barrel nut, viewers see the importance of using a specialized armorer's wrench. The presenter offers insight into the correct installation techniques for the suppressor, ensuring that it aligns correctly for optimal performance.
Key Tips
- Use penetrating oil: Always let the oil soak on stubborn pins or screws for a bit before attempting removal.
- Correct tools make a difference: Invest in a quality armorer’s wrench and the proper punches; they greatly ease the disassembly process.
- Document everything: Keep track of the order and orientation of parts as you remove them to simplify reassembly.
- Practice safety: Always ensure the firearm is unloaded and follow safety protocols when working on your weapon.
Key Takeaways
This video is an invaluable resource for AR15 enthusiasts looking to enhance their understanding of firearm mechanics and disassembly. It reinforces the message that while working on firearms can seem daunting, having the right approach and acknowledging the learning curve can lead to successful upgrades. Each component we removed serves as a step toward modernization, showcasing how small changes can significantly affect performance. Stay tuned for the next video, where installation of the new handguard will take center stage.